How practicing sports together helps promote social cohesion
Build a public outdoor gym

Outdoor gyms have become widely popular in West African cities. Sports activities in public space are not only inclusive and accessible. Working out with friends is great fun, reduces stress and boosts self-confidence. Practising sports can help young people to clear their minds and activate their inner strength. By doing it together, it also promotes social cohesion.
By creating an outdoor gym with locally sourced materials you are actively contributing to these positive effects. Employing local skills is great for the economy, but also makes your gym easier to maintain and cost-effective in the long run.
In this tutorial, we will guide you step-by-step through the process of engaging with the community, employing local knowledge to procuring materials, testing and installing the training equipment. Ready? Set … go!
Warm-up
1. Find a location
How to get started? Search a suitable location for your outdoor gym. Find out about the places where young people like to hang out. Preferably choose an area which naturally draws the audience you are aiming for. As steel (our main building material) can get really hot, prioritise shaded places over sunny ones.
When possible, use the advantage of an extensive roof of a building or a shading tree. Last but not least, make sure the location provides enough space for the outdoor gym’s base.
2. Consult with the community
Once you found your location, get in touch with local stakeholders: Usually, these are local authorities, landowners, youth centre facilitators, leaders of sports associations, nearby communities and potential users of the gym: the local youth.

By consulting with the community, you give people a chance to ask questions and share their knowledge and concerns. Furthermore, you lower the risk of potential conflicts or disagreements arising during the building process leading to considerable delays. Show the project when asking for permission, and clearly describe its goal. Take the community’s wishes into account, be transparent by communicating decisions and explain if certain ambitions are not feasible. Get smart on where to find the necessary resources or the contacts of reliable artisans nearby.
Checklist:
- Make a map and mark the location (if possible, meet directly at the building location)
- Print the designs, visualisations and technical drawings
- Measure and mark the dimensions of the gym with tape, calk or stones
Insider tips:
Take a second facilitator with you to document the session with notes and photographs. This will help you put your entire focus on engaging with the community.
Make a list of possible questions to equip yourself with answers beforehand. This will help you to stay cool and decisive throughout the meeting.
Get going
3. Employ local knowledge

Time to find an experienced welder for the job. Always go for local expertise as it supports the local economy. It also inscribes local aesthetics and craftsmanship into the gym and will allow for easy maintenance. Try to locate a welder within or close to the area you selected. And ask for the possibility to weld in situ. If you don’t have this possibility, fix a price for transportation and installation upfront.
Briefing the welder:
- Bring the technical drawings with the training equipment and dimensions as a printout.
- Ask your colleagues from procurement for help when negotiating the price.
The costs should include working hours, transport to location, installation and materials. - If possible, allow for an advance payment to facilitate buying materials and transportation costs. Always keep a fair amount of the payment for the end, after all deliverables are met.
- Fix a clear starting and delivery date.
- Ask the welder to paint the training equipment with anti-corrosive paint after welding.
Insider tips:
Showing pictures of already realised work can help to visualise the expected outcome.
Make it to the finish line
4. Create the base
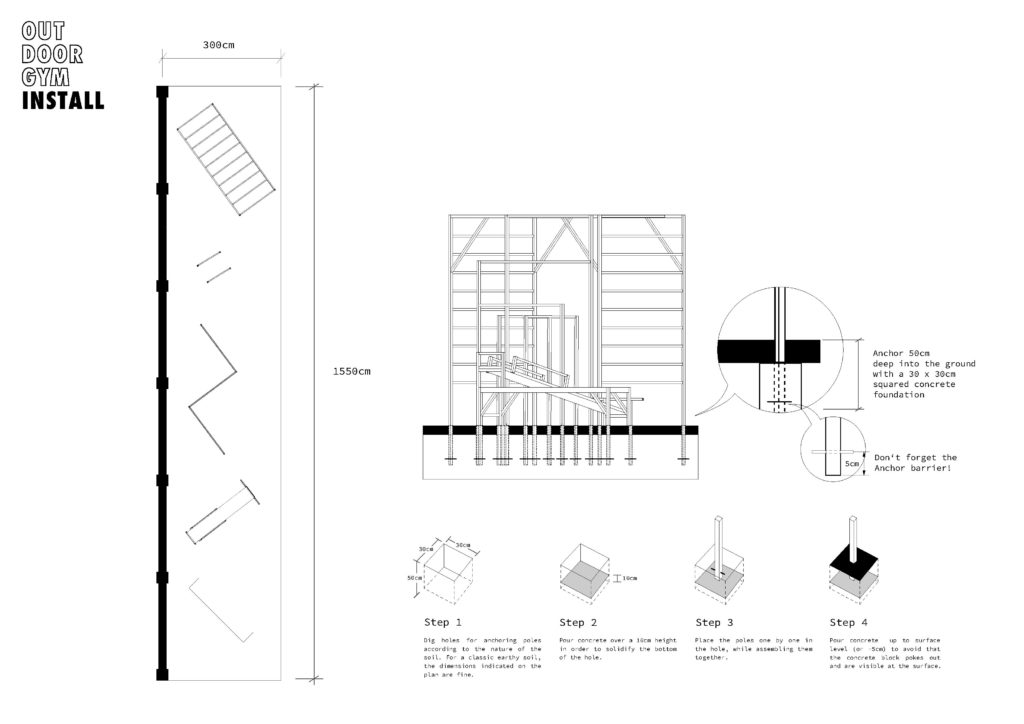
While the welder is getting the training equipment ready, get in touch with a local mason to pour the gym’s concrete base (see dimensions). This is a 1 to 2 days job and should be completed 2 days before installation. Check the weather forecast before installation day. Sunny weather will help to dry the concrete, while rain needs to be avoided at all times. This activity is not suited for the rainy season.
5. Approve workmanship
Regularly check on the progress and report possible problems quickly. It’s important to have eyes on the ground throughout the process. On delivery day, make sure to make a detailed assessment of quality. Look out for potential security risks and the stability of the training structures.
Checklist:
- Is the training equipment well anchored in the ground (see anchoring advice)?
- Does the welding seem smooth?
- Do you discover any steel surfaces without anti-corrosive paint?
- Test it yourself, if you feel comfortable with it!
- If necessary, communicate changes to the welder and reschedule for final delivery.
Pump it up!
Congratulations! You did it. Thanks to you, all muscles are back in motion. And you did it with locally sourced materials only! What a great feeling. Communicate and arrange for an inauguration date with music and refreshments so you can introduce the new equipment to the community.
No Paint, no gain
As for every great sporting ground the backdrop of the performance matters. A colourful mural painting creates not only an attractive stage for ambitioned athletes but is a pull-factor for other young people from the region to visit the place. Organise a Street Art Together workshop to increase participation and create a sense of ownership.
The Outdoor gym in a nutshell
Suggested time: 18 days
Materials needed: Steel pipe round and squared (see manual)
Participants: 1 mason, 1 welder
Location: inside a youth or sports facility or in public space
Estimated costs: 2300 USD
This article was first written by Simon Meienberg, who also made the pictures and illustrations.
Similar

Journalist toolkit
Online and offline tools for training journalists on migration

Tips for writing mission and vision statements
These tips will help your organization write clear and useful mission and vision statements

Mobile cinema promotes safe migration
Lessons learned from the CinemArena Project